Tutorial: Markdown in ADO
This tutorial gives an overview of how to work with Markdown. It describes how to change content on the "PCP R&D Processes" website, and can also be valuable for anyone using Markdown in Azure DevOps (ADO).
Overview
Main topics:
- Introduction to Markdown
- Writing Markdown
- Editing Markdown on ADO Wiki
- Review and Approval
- Pictures and Diagrams
- Advanced editing in Visual Studio Code
Pre-conditions:
- You need an ADO license to be able to edit Markdown in ADO
- You need access to the "PCP-Test" project in ADO (talk to ADO admin)
- If you want to change information on the "PCP R&D Processes" website - you need access to the "OpEx" project in ADO
Intended audience
The tutorial is intended for Process Teams, QCMs, and OpEx members who want to change processes and guidelines on the "PCO R&D Guidance" website. But it can also be interesting for Developers and Testers who write Markdown on ADO Wikis.
Introduction to Markdown
Markdown is a lightweight markup language. It adds simple formatting elements to the text, still keeping the text readable in any text editor.
The Markdown is translated to HTML in the background by ADO Wiki. The writer does not need to bother about the more complex HTML format or CSS styles. This is one of the simplest ways to create web pages available today.
By using a "published wiki" (version controlled Wiki) in ADO, the writer can merge, branch, baseline, and release documentation. Every set of changes is "committed" by the writer with a short message describing the major changes made. When all the changes are completed, the writer can ask colleagues to review and approve all the committed changes in a pull request before merging the changes into the "main" branch.
Benefits
- It is easier to reuse what teams have written on their Wikis
- No HTML hassle
- Full versioning and audit trail in DevOps
- Encourage small changes more frequently
- Encourage bulk changes (e.g., change all "IACT" to "PAPCP" in all files)
- Reviews can be done individually at any time - no need for big review meetings
- Mandatory/optional reviewers in pull-requests
- It is easier to achieve one consistent website rather than many individual documents with overlaps
Process Website and ADO Wiki
The "PCP R&D Processes" website is generated from the markdown files stored in the ADO project "OpEx." The website gives read access to anyone in PCP, and you don't need any licenses to read the contents. The user interface makes it easier to navigate and find information. It also has search capabilities and a fast display exchange time (less than one second).
The website is automatically generated from the "master" branch in ADO. The whole site is also baselined every quarter, and changes to the markdown files are logged on the latest baseline (see the changelog)
When you want to edit a page (you need privileges), you must do it in ADO. For convenience, there is a link at the end of each page on the process website to the ADO wiki, where you can edit the file.
Writing Markdown
The most common formatting elements used in Markdown are shown below. There are different dialects of Markdown, but if you use "Common Mark", most wikis and translators can manage it.
Avoid using HTML in Markdown. The "raw" markdown (text file) becomes hard to read and maintain. If you discover you are adding a lot of HTML elements or using CSS to make the page look better - you should likely take a step back and use the "Common Mark" recommended formatting.
Example
## Example of Markdown
This is some **bold** text, or why not _italic_ text, or maybe some ~~stikethrough~~ text.
Underline is not supported by Markdown, but you can use HTML tags. <u>This is an underlined text sentence</u>
> Using blockquote
- Bullet 1
- Bullet 2
---
1. Numbered list item 1
2. Numbered list item 2
### Pictures


Note: Externally referenced pictures (http://picture.com/image123.png) are fetched from the external source every time the page is shown, but local pictures (./image123.png) are moved to the webserver and are fast to render.
## References
- [external](https://www.scaledagileframework.com/)
- [internal](../Process/CM)
Note: Use relative links ("../../Guides/guide123") between markdown pages within the Wiki.
Cheat-sheet
| Formatting | Example | Comment |
|---|---|---|
| Headings | ## my title ### my second title | Avoid using single "#", start with "##" |
| Bulleted list | - this is a bullet - this is a sub-bullet | Start with 2 blanks to get a sub-bullet |
| Numbered list | 1. a numbered list item 2. a sub-list item | Start with 2 blanks to get a sub-list item. |
| Horizontal rule | --- | Three dashes gives a horizontal rule/line across the page |
| Bold text | **this is bold text** | Two asterisks before and after the text. Do not add a blank between the first and last word |
| Italic text | *this is italic text* | One asterisk before and after the text. Do not add a blank between the first and last word |
| Strikethrough | ~~strikethrough text~~ | Two "tildes" to strikethrough text. |
| Blockquotes | >block quoted text >> nested blockquotes text | Blockquotes can be nested |
| Links | [Link Text](http://www.example.com) | use relative links (e.g., ../../test) between internal markdown pages, and absolute links (e.g., http://anypage.com) for external links. |
| Pictures |  | Note the initial "!". A picture must be in a separate file (e.g., xx.png, yy.svg) |
Frontmatter
You can add frontmatter (= metadata) in Markdown. This is extra information used to generate the process website with menus, tag pages, category pages, etc.
The frontmatter is between the "---" at the top of the page. It consists of name: value pairs (must be a blank character after the colon).
---
title: This is a title shown on the top of the page
linkTitle: This is a shorter title for menus
draft: false
categories: [Architecture]
tags: [How to Guide]
roles: [Architect, Cyber Security Engineer]
owner: Owner of the page
pdf: true
---

Here you write your **Markdown** as usual
title
This is the title of the page and is automatically added as "header-1". This is the reason why you shouldn't use a single#in the markdown section, but always use##,###,####, and so on.linkTitle
The title is shown in menus or sidebars. Sometimes, when the title is long, you want to have a shorter name shown in the menus. E.g., "title: How to perform static code analysis," and "linkTitle: Static code analysis."draft
Set totrueorfalse. A page withdraft: truecan be edited in ADO but is not visible on the generated process website. You can, e.g., work on the page for a while, and later when you are ready, setdraft: falseor remove the line (draftis false by default).categories
This is the process area the page belongs to, and at least one process area must be included. E.g. "Requirements", "Architecture", "Software Development", "Hardware Development", "Test", "L4 and Maintenance", "Configuration Management", "Cyber Security", "Quality and KPI", and "3rd-party and OSS".tags
This is the type of page, e.g. one of "Process", "How to Guide", "Conceptual Guide", "Reference Guide", "Tutorial", "Markdown Template", etc.roles
A list of roles with interest to read the page, e.g., "Software Engineer", or "Test Engineer".owner
The owner of the page (i.e. the process team)pdf
Set totrueorfalse. A page withpdf: falsewill not be a part of the generated pdf file at baselines. If missing, it defaults totrue.
Adding a page summary
The page content should start with a short introduction of the page before adding the divider "<!--more-->". The introduction part is used to provide a summary of the page.
---
title: MyPage
---

MyPage contains information about how to write Markdown. Keep the introduction short, just a couple of lines.
<! --more-->

And here comes some more markdown content.
More Information
Edit Markdown on ADO Wiki
You can work with Markdown directly in ADO using your web browser. A license is needed to access ADO and edit the Markdown. You also need to be granted access to the wiki and markdown files to be able to change contents.
In this tutorial, we use a test project in ADO called "PCP-Test". Here you can edit Markdown, branch, create pull requests, etc., without destroying anything. If you can't open the "PCP-Test" Wiki, ask your ADO admin for access (Dibya Pattnaik and Manuela Mantione can help PCP R&D users).
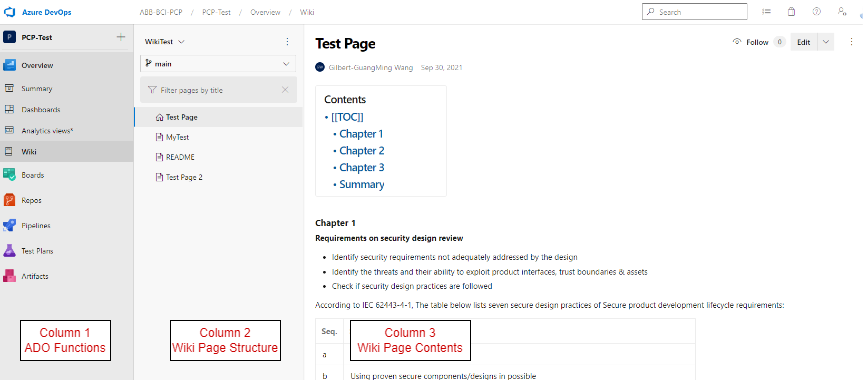
ADO interface
- The first column contains the ADO features (the Wiki is under "Overview")
- The second column contains the wiki page structure (it is possible to have both pages and subpages)
- The third column is the page with the contents
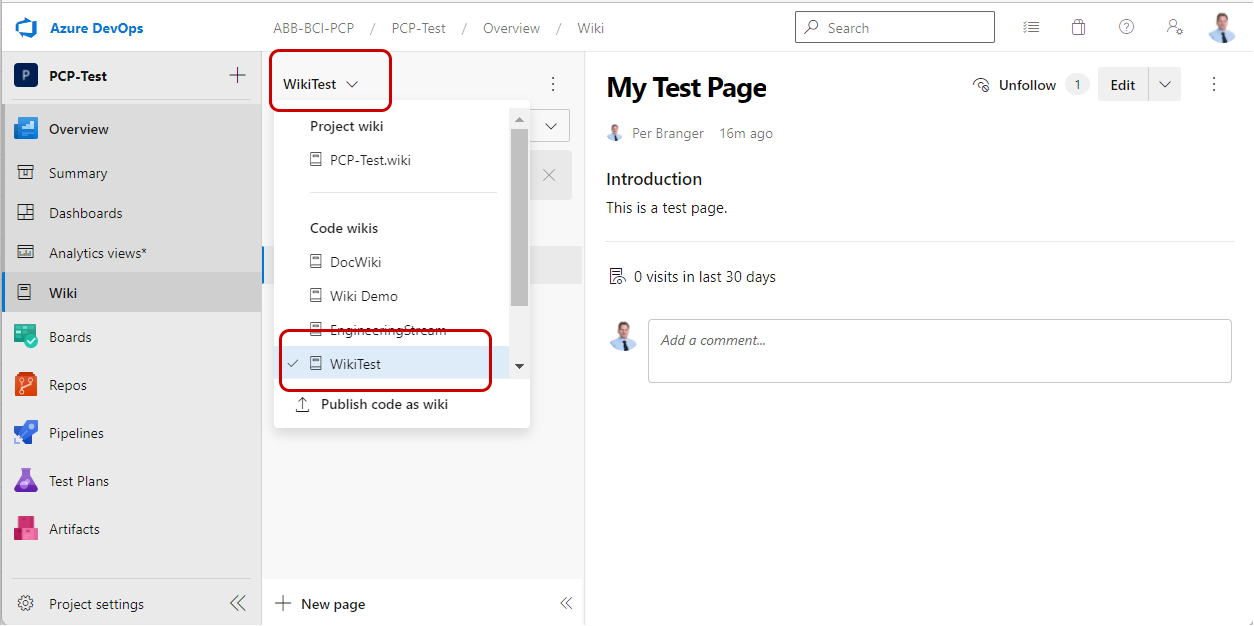
Select the Wiki
There may be more than one Wiki in ADO. The first you have to do is select the Wiki you want to work with.
-
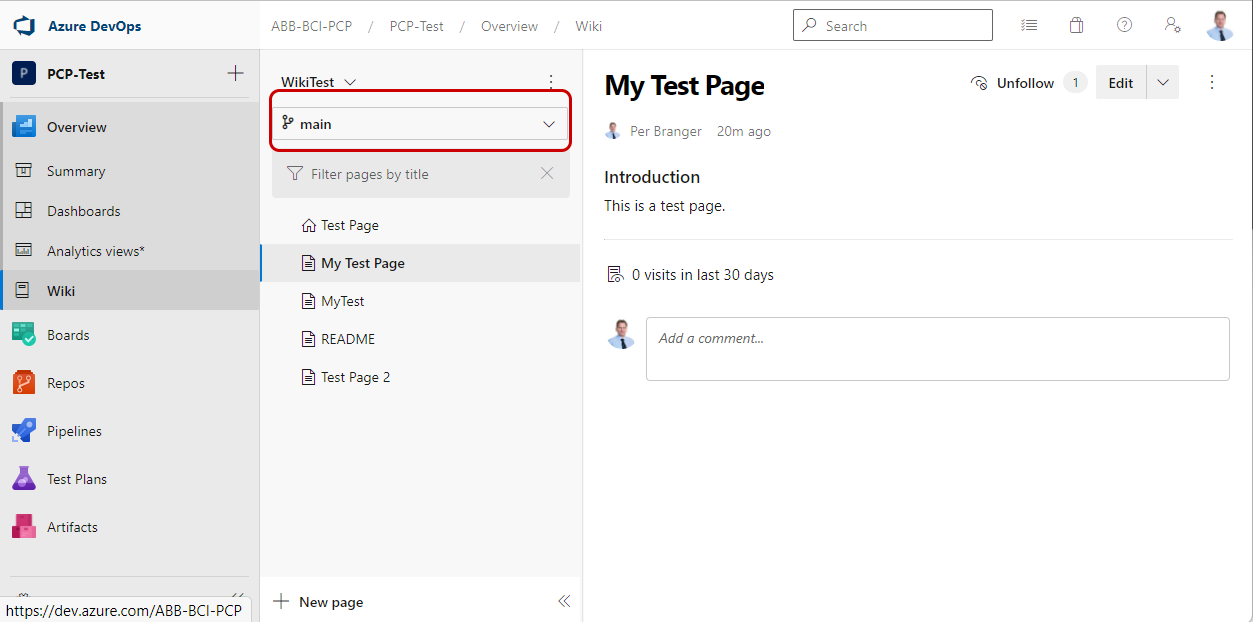
Select the Wiki from the drop-down menu (in this case, "WikiTest")
-
It is ok to work on the "main" branch in this tutorial while learning
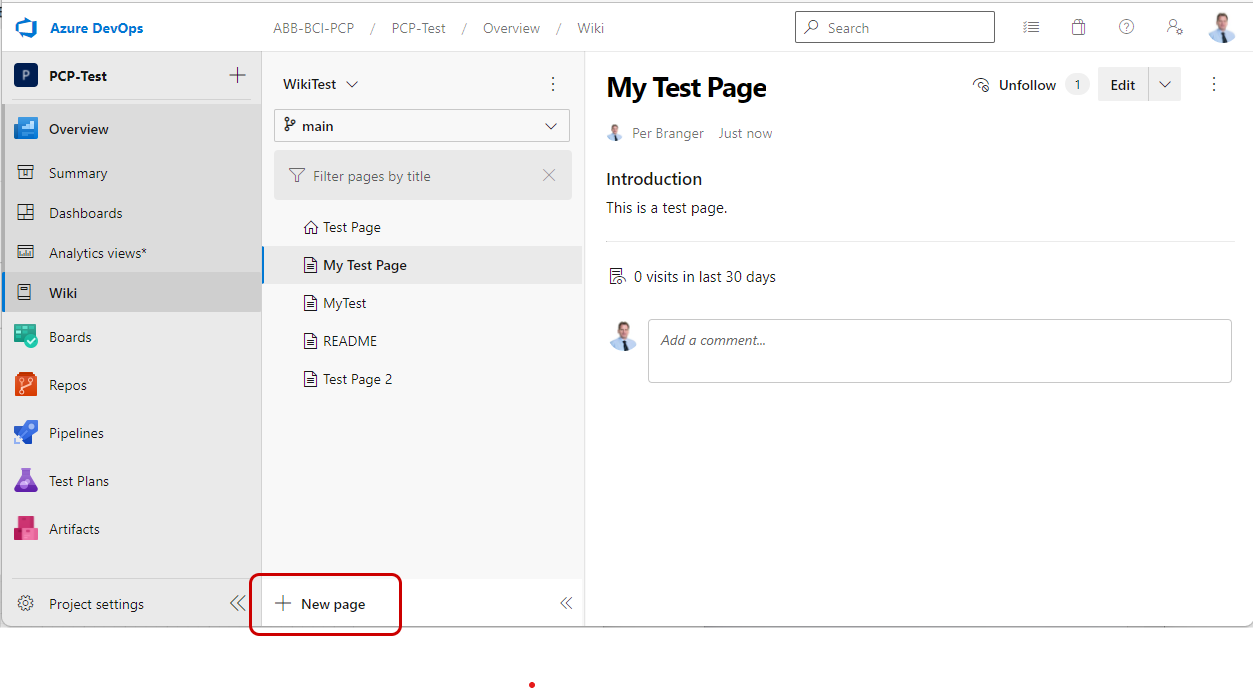
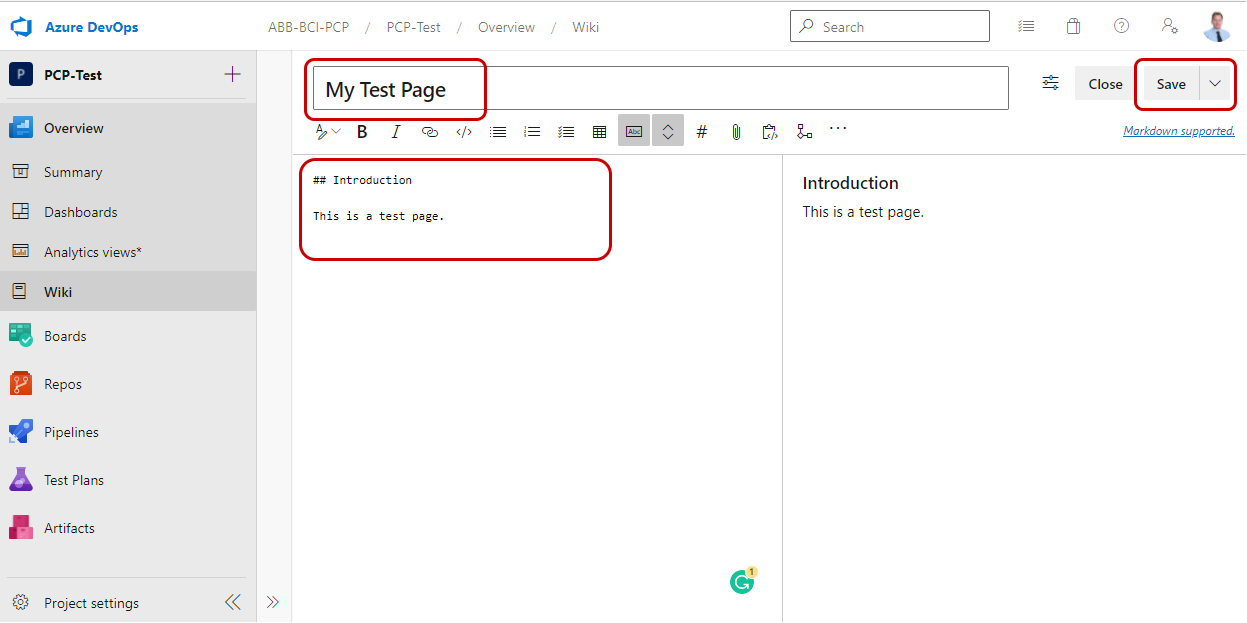
Create a new page
-
Navigate and select a page where you want to create a new page next to
-
Click on "New Page."
-
Enter the title and the Markdown you want to add
-
Click on "Save."
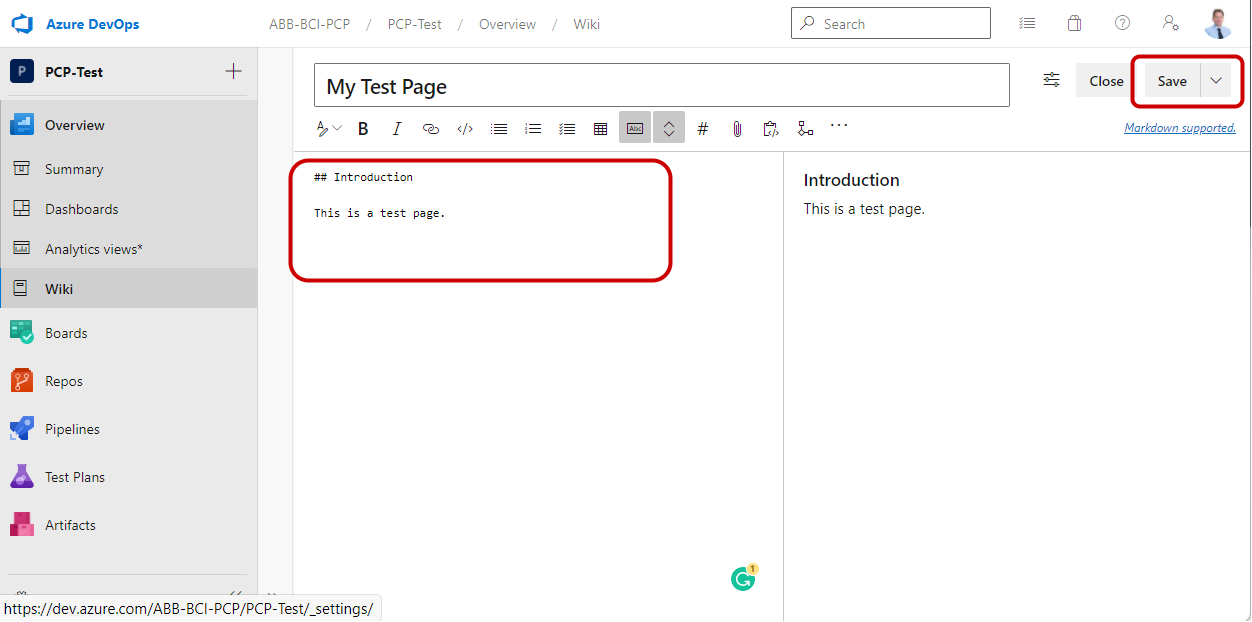
Edit an existing Markdown page
-
Navigate and select the Markdown page you want to change.
-
Click on "Edit."
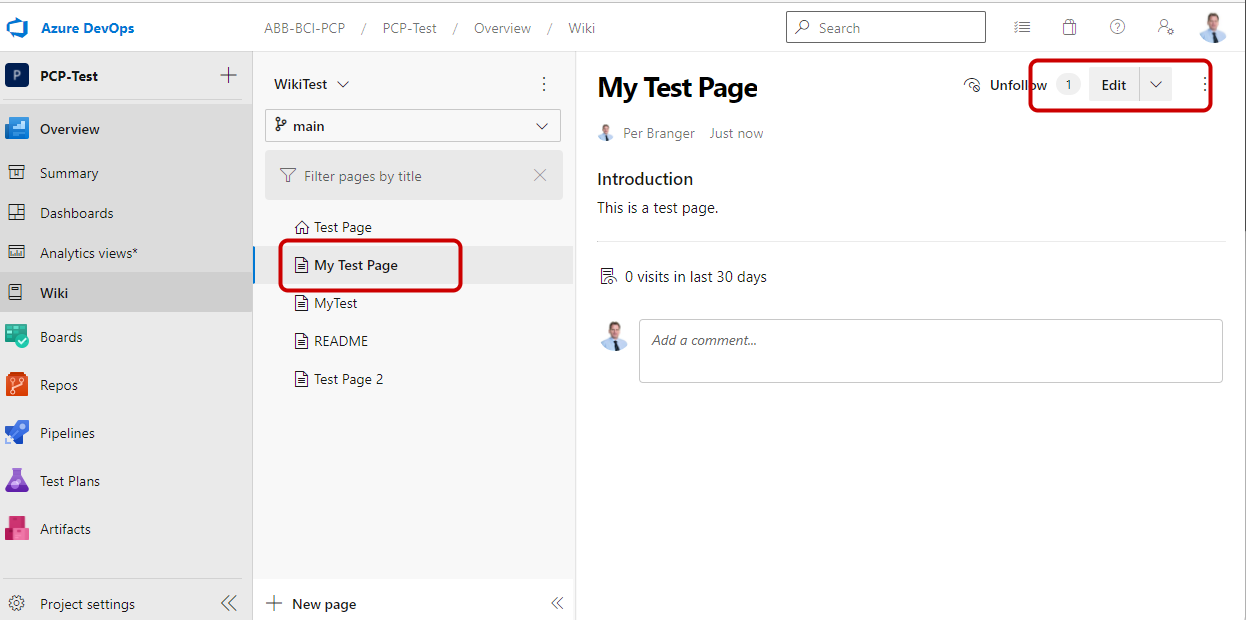
-
Make the changes in the Markdown you want to do (the changes you make will be logged)
-
Click on "Save."
Save with a revision message
When you save the changes made in a markdown file, you must provide a revision (commit) message. It is a short description of the changes made on the page. It is intended to give other users an understanding of the change.
It is recommended to give a message about the changes made and not use the default message. Compare the revision message to a "revision history" entry at the end of a document. Write the message so it is easily understood what changes were made without having to follow any references or similar.
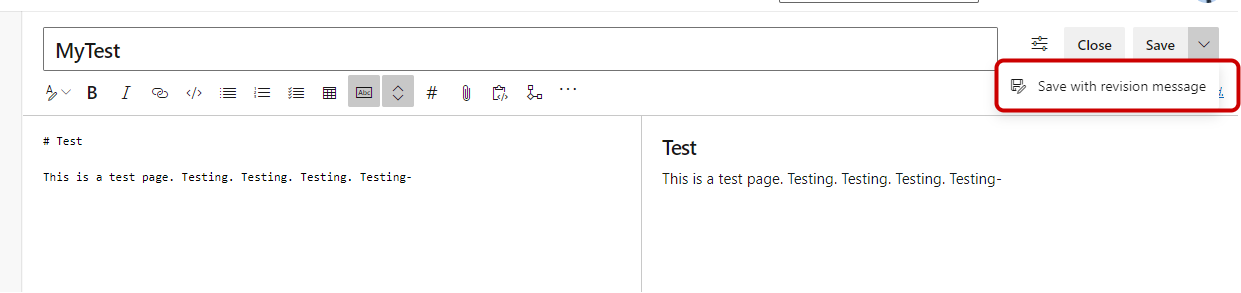
Tip: For small changes/fixes without changing contents, e.g., spell corrections - start the message with "fix:" in lower case letters.
Example:
"fix: Changed CT to PCP."
Images
Including images
Images can be added to any markdown page using the following markdown syntax:

The images can be of the types ".jpg", ".png" and ".svg". It is recommended to store the image in the same folder as the markdown file. To make it simpler to understand which markdown file the image belongs to - use the same as the markdown file.
E.g. "MyMarkdown.md" -> "MyMarkdown-1.png", "MyMarkdown-2.svg", etc.
Please use ".png" files. ADO can only render ".png" files in e.g. pull requests. Other types of images may not be visible - and it can be hard to review and approve the pull request if the images are not shown.
Using app.diagrams.net
A free online tool for making diagrams (e.g., flow charts, UML) is app.diagrams.net. The tool runs in your web browser. You can draw your diagram and save it as ".png" or ".svg" files on your hard disk. The tool is similar to Visio - but without any costs.
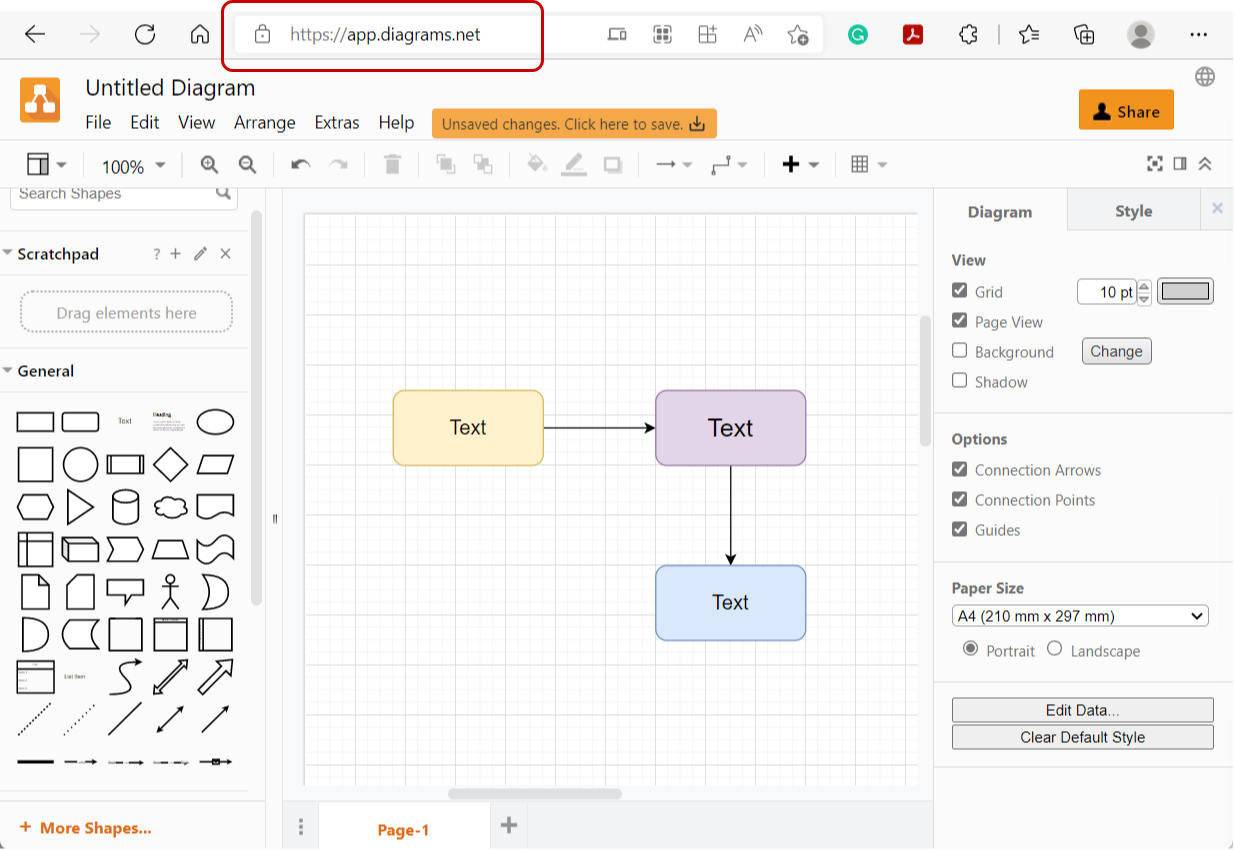
Tip: Save the file as "Editable Vector Image (*.svg)" or "Editable Bitmap Image (*.png)". With these options, the source code is included in the file, and you can reopen the file and edit it again". If you save it as ".svg" or ".png," you can view the files in a web browser, but not edit them again.
Tip: The online version is also available as an app for windows and can be downloaded if you want to use it offline. It has some smaller limitations compared with the online version - e.g., it can't handle PlantUML.
Advanced Tip: There is an excellent plugin in Visual Studio Code called "Draw.io Integration." With this plugin, you can edit the diagram files seamlessly in VSC. You need to name the image files "<name>.drawio.png" or "<name>.drawio.svg" for the plugin to recognize them.
PlantUML
PlantUML is a text-based language that generates a variety of diagrams. Since the diagrams are generated from text, and the text is stored in ADO - it is possible to track any changes made to the diagrams. This is not possible if you use a ".png" or ".svg" file (binary data).
PlantUML can be added directly in the Markdown. Unfortunately, ADO cannot translate PlantUML to images, but the website generator can.
Example:
```plantuml
Bob->Alice : Hello!
```
This will show up on the page as:
Bob -> Alice : hello
More information and an online editor can be found here: https://plantuml.com/
: app.diagrams.net can handle PlantUML and translate it to a ".png" or ".svg," that can be included as an image in Markdown.
Review and Approval in ADO
The review and approval of Markdown are made with a pull request. It is a request to pull information from the branch you are working on to the "master" branch where the approved contents reside.
"A branch is an isolated version of the code that you can work on offline without impacting other developers on your team." [Azure DevOps].
For Markdown, the pull request can be seen as a review and approval step of the changes. You can assign mandatory and optional reviewers to the pull request. When the reviewers have approved the changes - ADO automatically merges the changes into the "main" branch.
It is recommended to remove the branch after the pull request. A branch should not be kept alive for longer times since it then can be harder to merge it into the main branch (i.e., others are updating the same file as you are working with leading to "merge conflict")
Create a new branch
A branch cannot be created from the Wiki. You need to navigate over to the ADO Repos and create it from there. You can always navigate from the Wiki to the Repo by selecting any page on the Wiki and choosing "Edit in Repos."
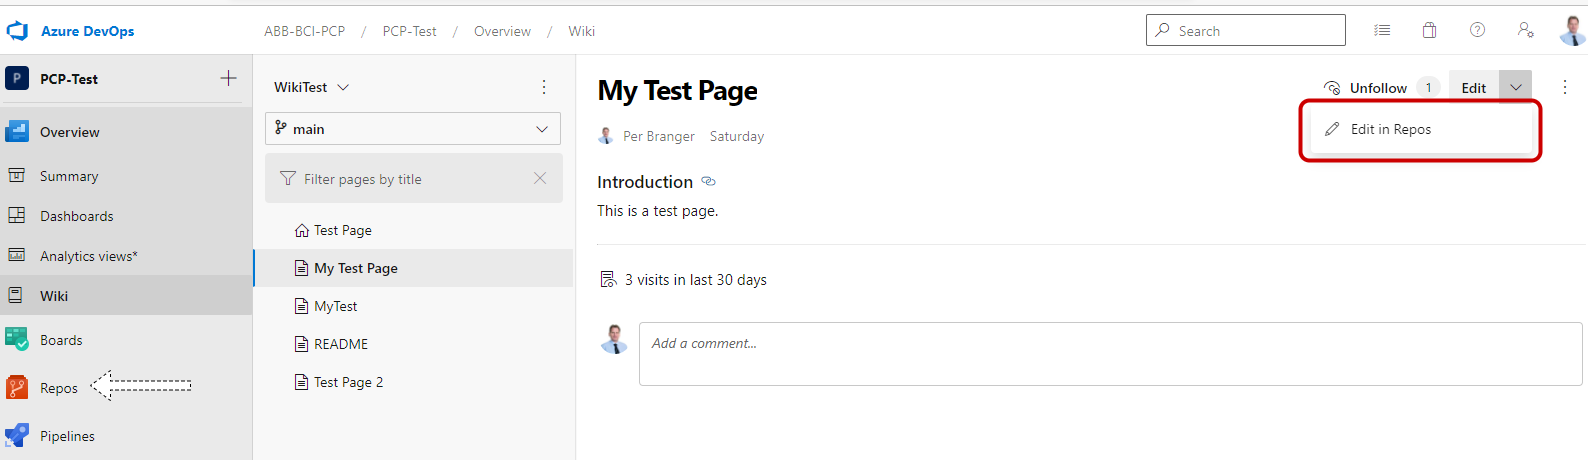
Note: If the Wiki is like "Microsoft Word" for changing contents, the "Repo" is like the file and folder structure seen in "Windows File Explorer."
When you are in the "Repos" view in ADO, create a new branch by selecting the drop-down menu under "main."
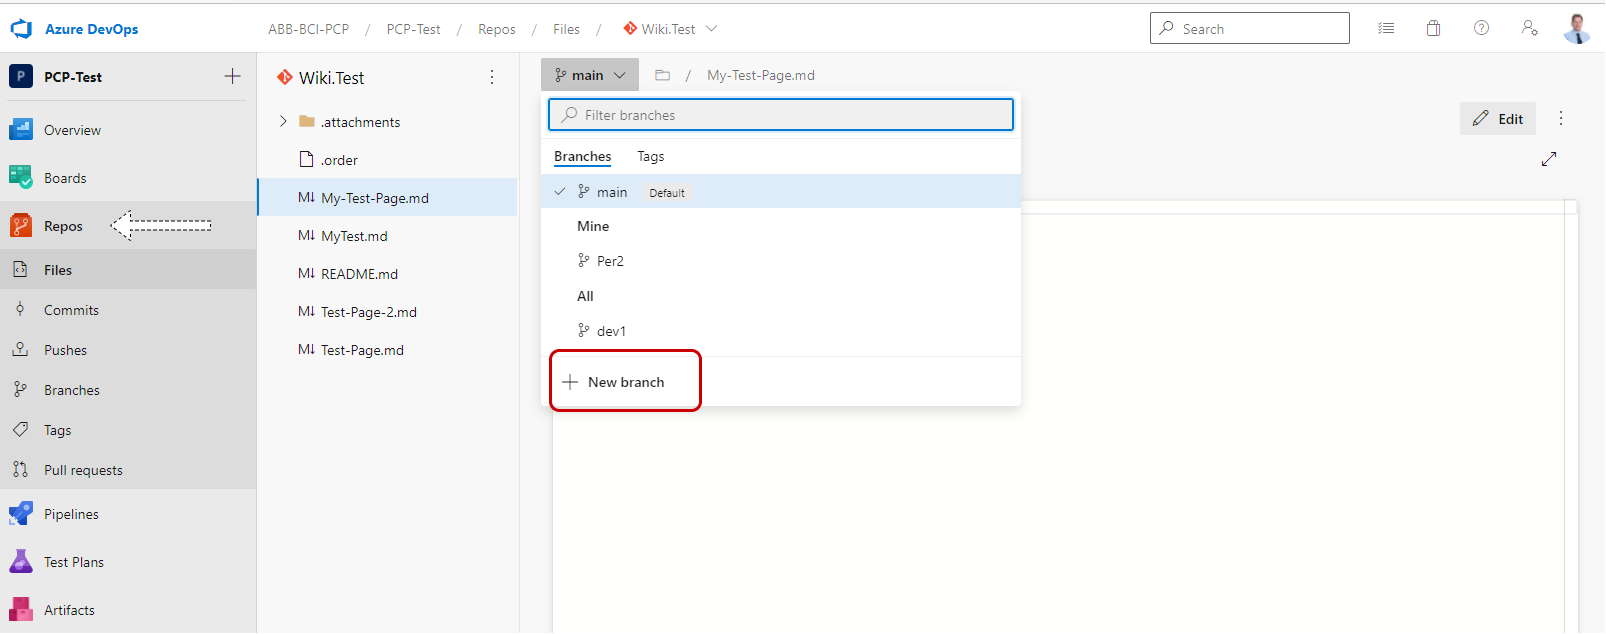
Give the name of the branch, choose "based on" "main" or "master", and create the branch. You can also refer to a work item (e.g. a PCR) for the branch.

Keep the naming of branches consistent. Recommended names are:
- users/username/description (e.g. users/searnto1/Update-Of-Coding-Guide)
- users/username/work-item (e.g. users/searnto1/PCR-1469)
- feature/feature-name (e.g. feature/Update-Product-Issue-Number)
- feature/feature-area/feature-name (e.g. feature/Architecture/Threat-Model-Guideline)
- process-area/description (e.g. Architecture/Architecture-Modeling-Updates)
Create a pull request
After the branch is created and you have made the update necessary, it is time to review and approve the contents. Create a pull request for merging the branch you worked on to "main." There is no limit on how many markdown files you attach to the pull request.
Navigate to "Repos" and click on "Pull requests":
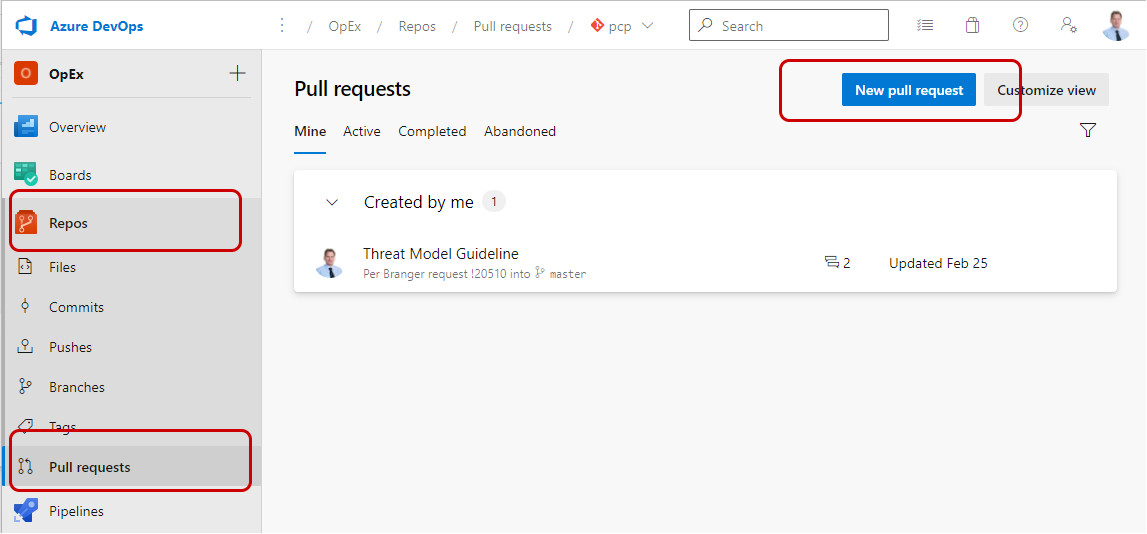
Create a new pull request:
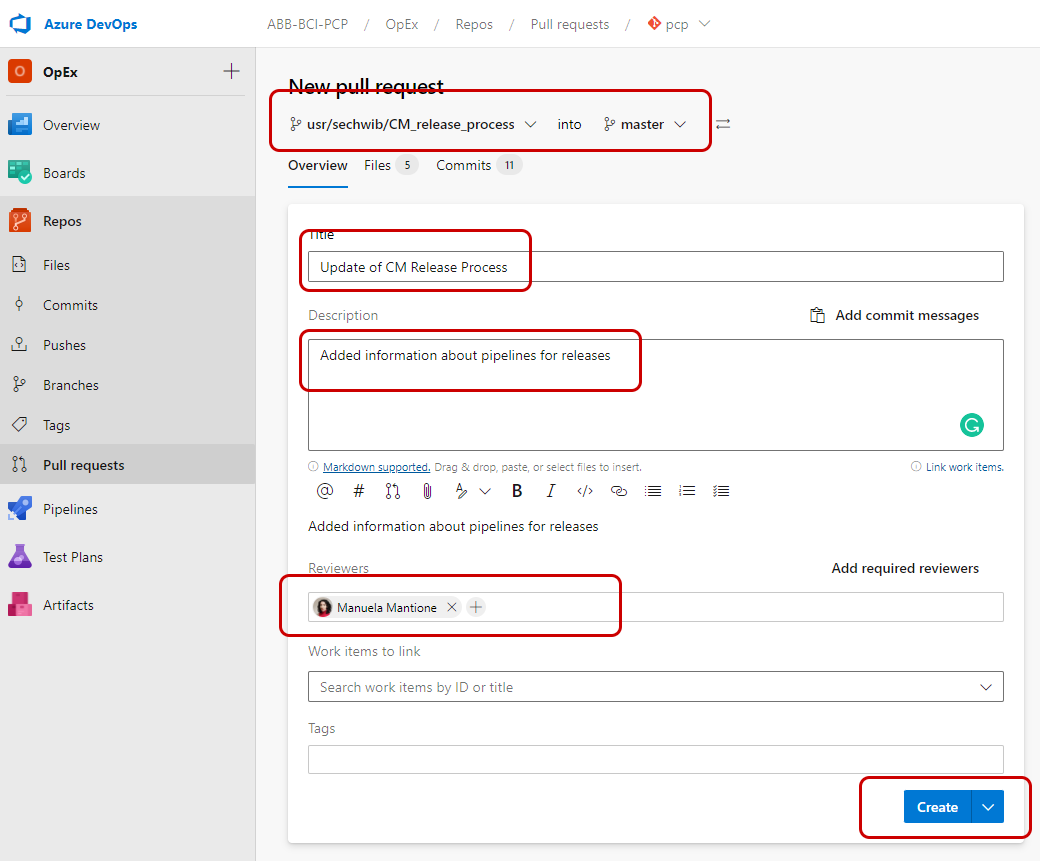
The reviewers get a mail from ADO to complete the review. When all reviewers have approved, the owner of the pull request can open the pull request and "complete" it. The changes are automatically merged into the "main" branch by ADO.
: If you add the owner as a reviewer - the author doesn't receive a mail, but the other reviewers do.
Review and approve a pull request
Each assigned reviewer (at least the mandatory reviewers) must do a review of the contents (the diff can help to see what changes have been made and what to focus on).
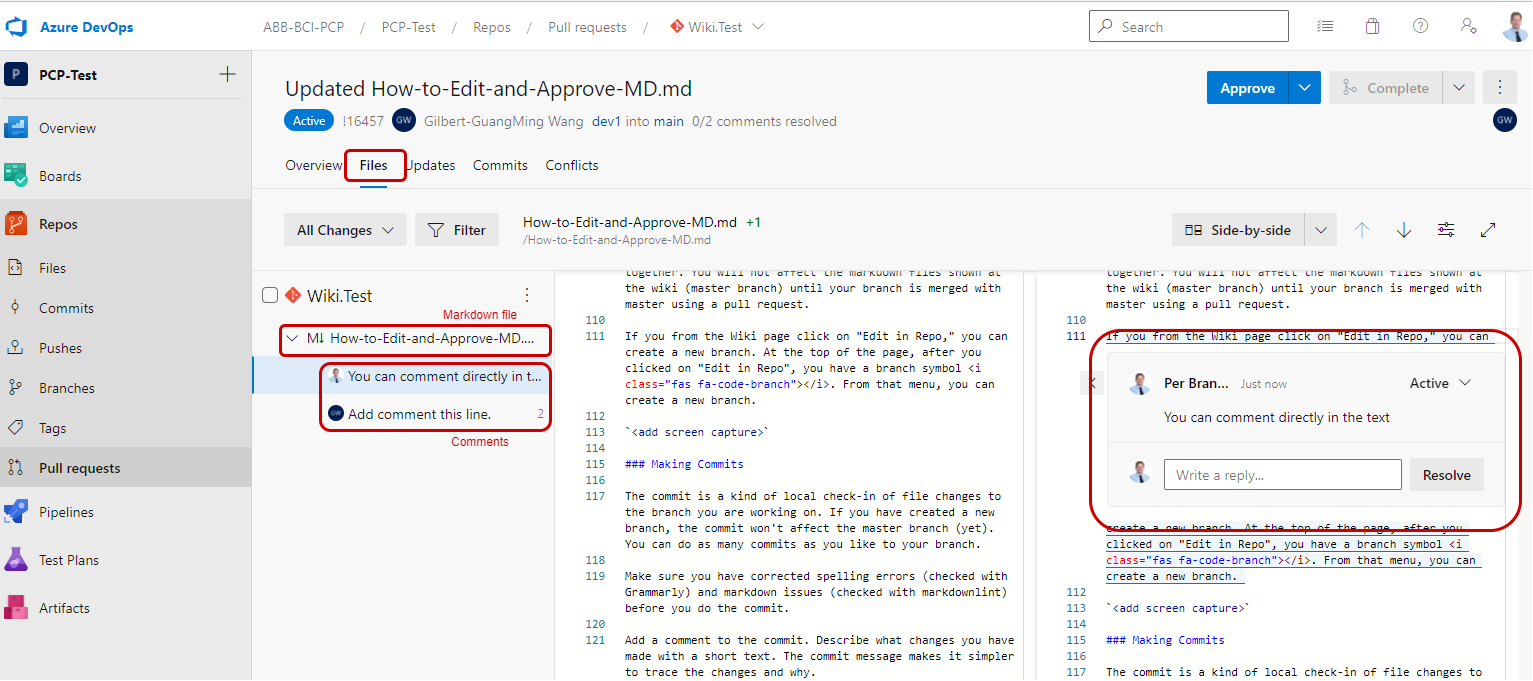
There are two ways of giving comments. One is to use the discussion fields if you want to comment or ask questions in general.
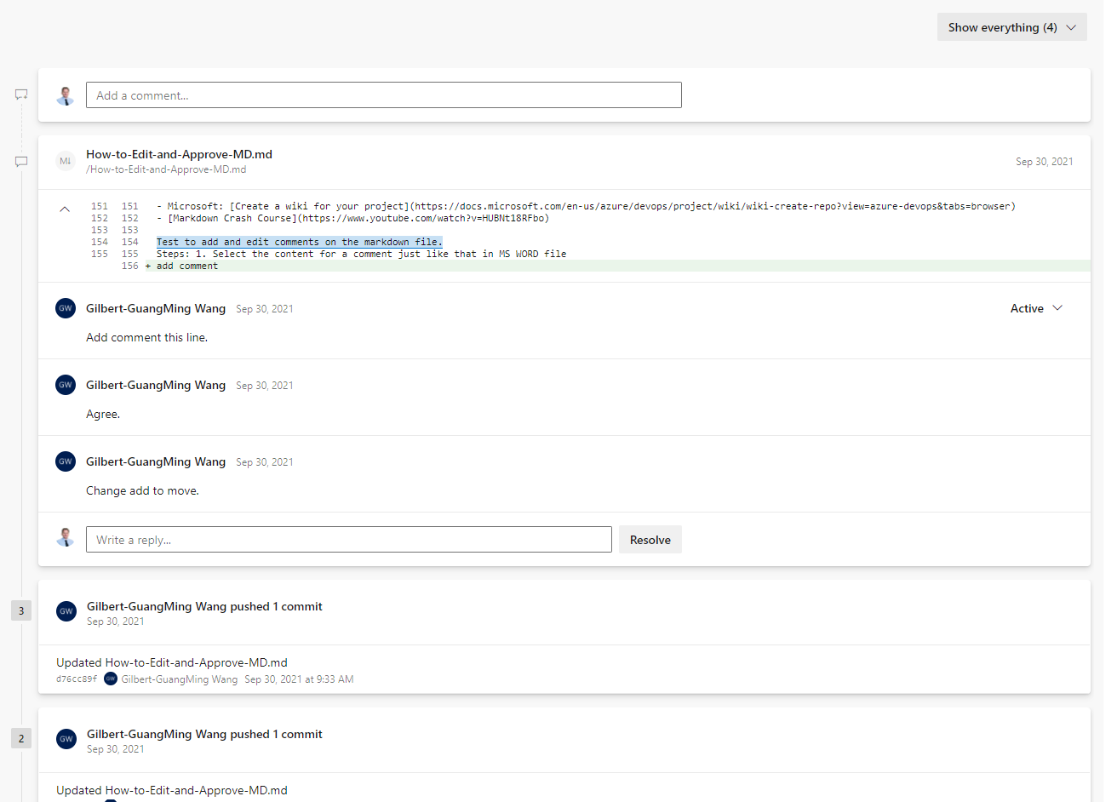
The second way is to add comments directly in the Markdown. Just go to "Files," and you can see the files that have changed (can be more than one file), and click on the file you want to look at.
When the reviewers have reviewed, discussed, and made necessary changes - each reviewer needs to approve the changes before the merge. You can follow the reviewers' status in the overview section of the pull request.
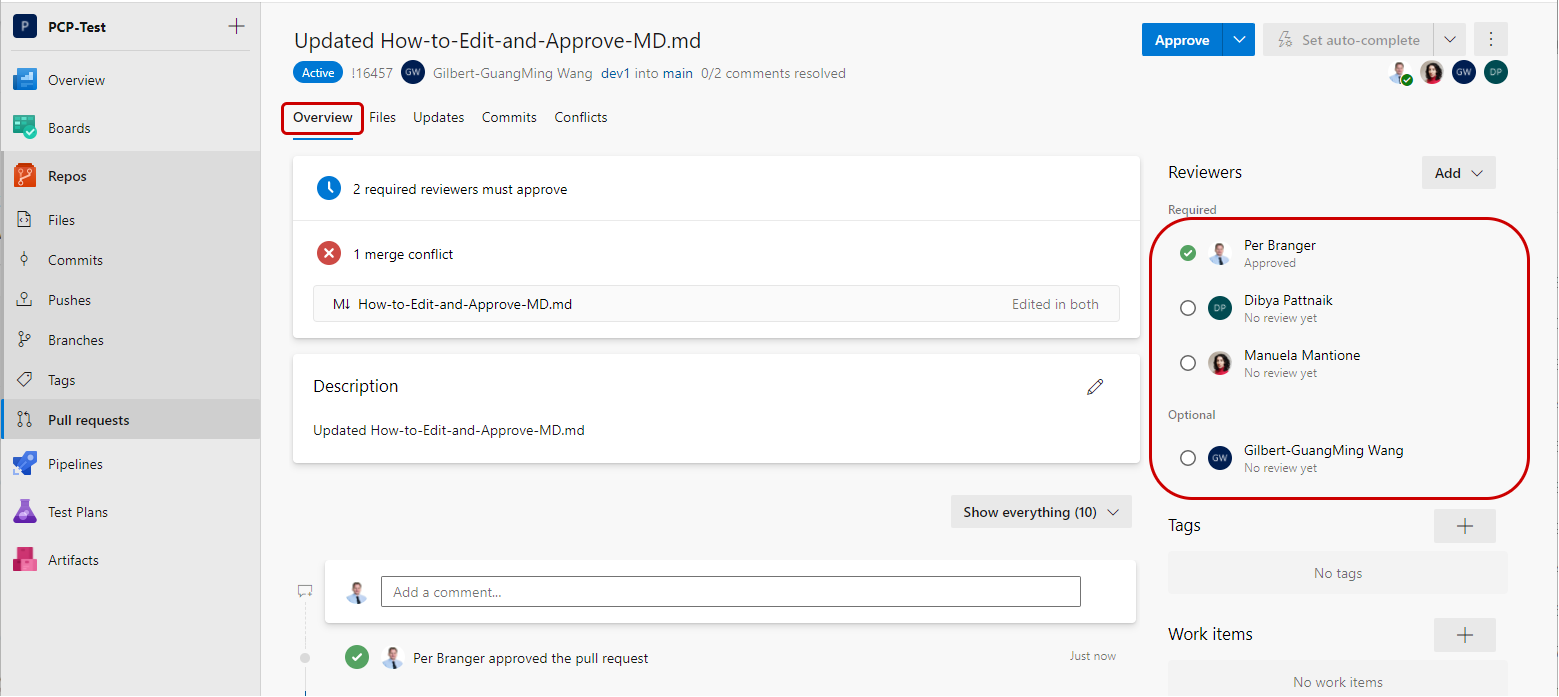
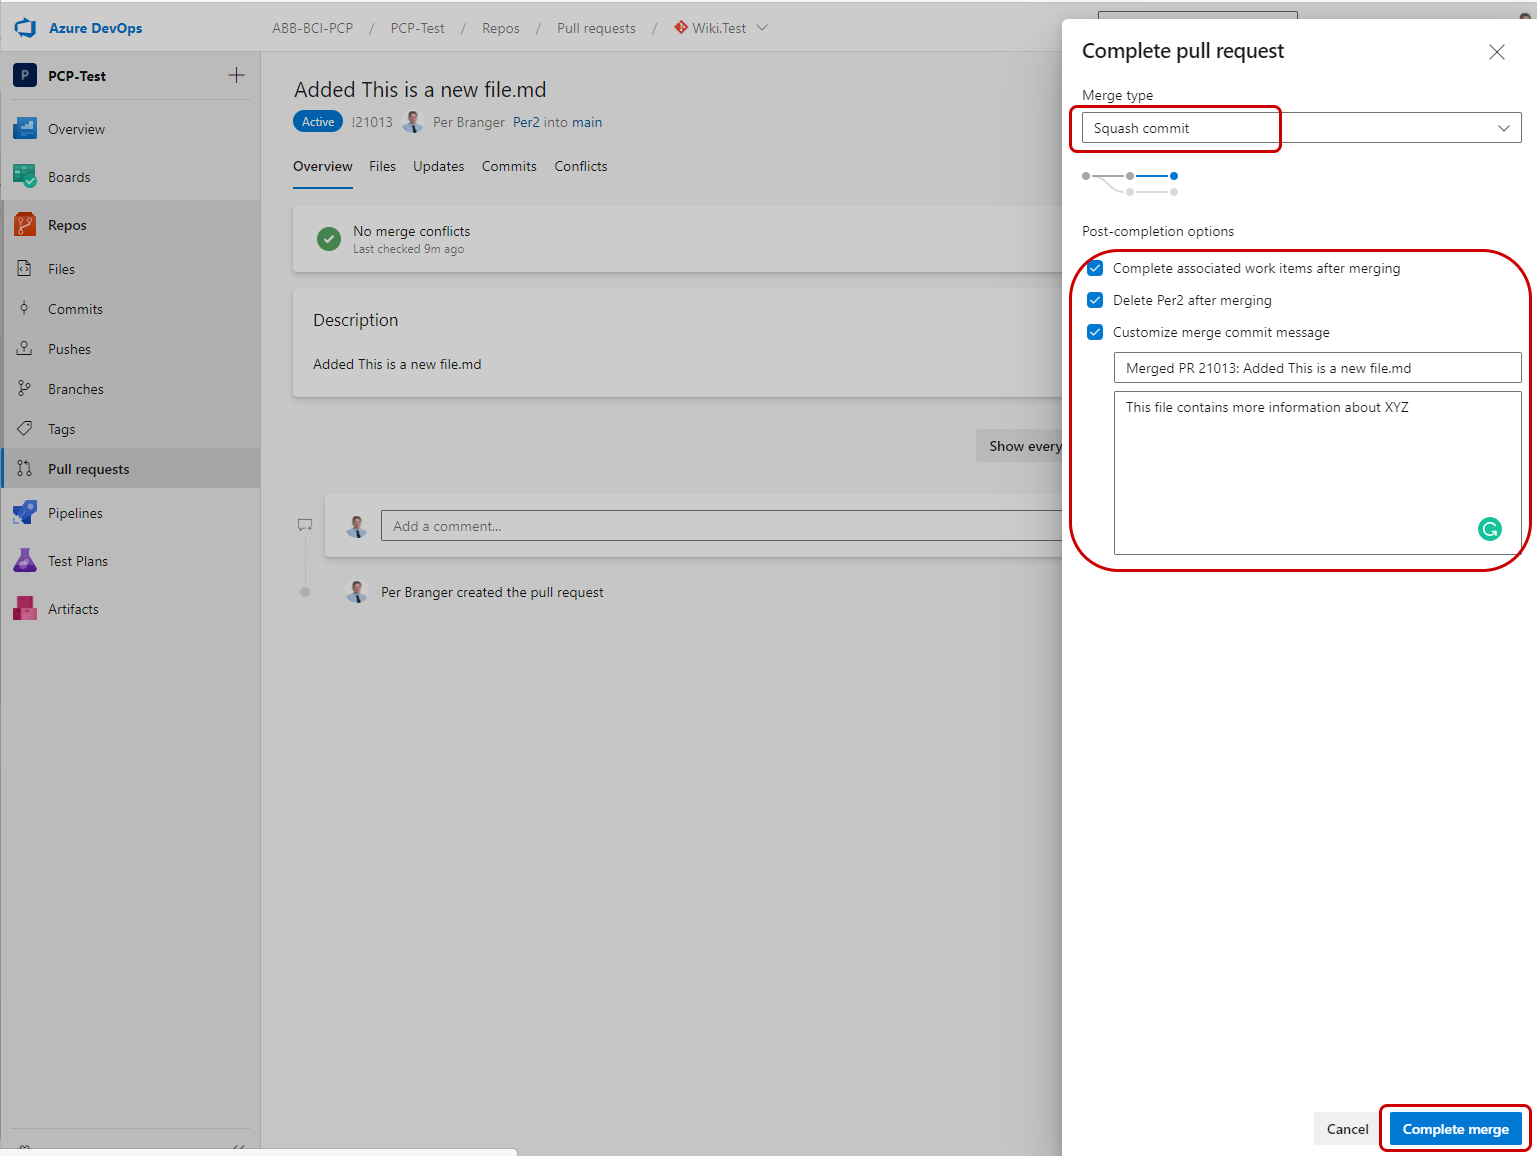
When everyone has reviewed and approved, it is time to merge the changes into the main branch. Click the "Complete" button, choose "Squash commit" in the drop-down, and select the checkboxes that are valid for you. It is recommended to delete the branch when merging it into "main" (second checkbox).
Enter "fix:" at the beginning of the pull request for small changes like spelling corrections or an update of the frontmatter (metadata). These messages are filtered out in the changelog and are not shown to the website users. The reason is not to overwhelm the users with many insignificant details about changes.
Adding a checklist to a pull request
To simplify the pull request review and approval, it is possible to add a template to the pull request with a checklist. You can have several templates/checklists predefined. Select the checklist you want to use when the pull request is created.
See the pull request template for more information.
Merge conflicts
If two persons have been working on the same markdown file in different branches - then there is a risk you get a merge conflict. ADO recognizes if someone else made conflicting changes compared with yours, avoiding the risk of overwriting someone else's changes.
In this case, ADO warns you about the conflicts and asks you to merge the changes manually.
See Microsoft: resolve merge conflicts for details.
Withdraw a page
To withdraw an R&D process page, do the following steps:
- Make sure a PCR exists to withdraw the page.
- Go to the page to be withdrawn on the process website and open
backlinks- take notes of all other pages that are referencing the withdrawn page. Investigate the impact on other pages and inform process owners of required changes on the pages referencing the withdrawn page. - Move the page to the
/docs/Withdrawnfolder (these will automatically be set indraftand not shown on the website). - Edit each backlink page listed in 2. and remove the references to the withdrawn page.
- Make sure the withdrawn page is communicated at the quarterly demo about process changes.
If a reference to the withdrawn page is missed, the pipeline generating the process website will check for broken links.
: If someone is referencing the withdrawn page from outside of the process website - they will end up in a "404 - File or directory not found" page. The link must be removed also from other sources external to the process website.
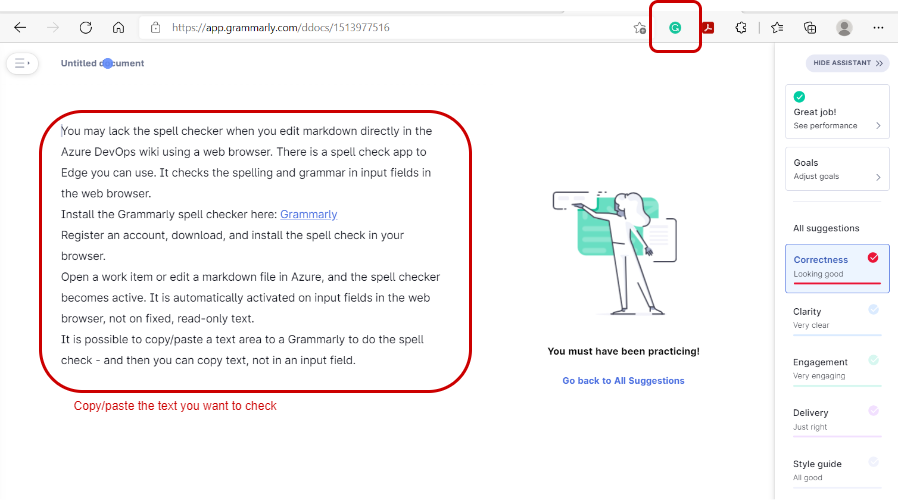
Spell checker
You may lack the spell checker when you edit Markdown directly in the ADO wiki using a web browser. There are spell checker apps to Edge you can use. It checks the spelling and grammar in input fields in the web browser.
A recommended spell checker is Grammarly.
Register an account, download, and install the spell checker in your browser.
Open, e.g., a work item or edit a markdown file in ADO, and the spell checker becomes active. It is automatically activated on input fields in the web browser, not on fixed, read-only text.
It is possible to copy/paste a text to Grammarly to do the spell check if the text to be checked isn't in an input field in the web browser.
Advanced editing in Visual Studio Code
For the more savvy and experienced writers/coders, you can use Visual Studio Code (VSC) to edit Markdown. With VSC, you get an environment for editing files in Azure DevOps with many available plugins that improve your productivity.
VSC is an open-source editor free to download and use. It should not be confused with "Visual Studio," which requires a license.
See Introduction to Markdown in Visual Studio Code (with Markdown worksheet!) - YouTube
Good plugins for VSC to consider:
- Grammarly - spell checker as you write
- Draw.io Integration - draw pictures in VSC and include them in Markdown
- PlantUML - makes it possible to write and show PlantUML diagrams in VSC
- + hundreds of more plugins
References
ADO Test project for PCP R&D (use it to try Markdown and Repos - ask ADO admin for access)
Diagrams:
Grammarly
Visual Studio Code
Git
Azure DevOps docs